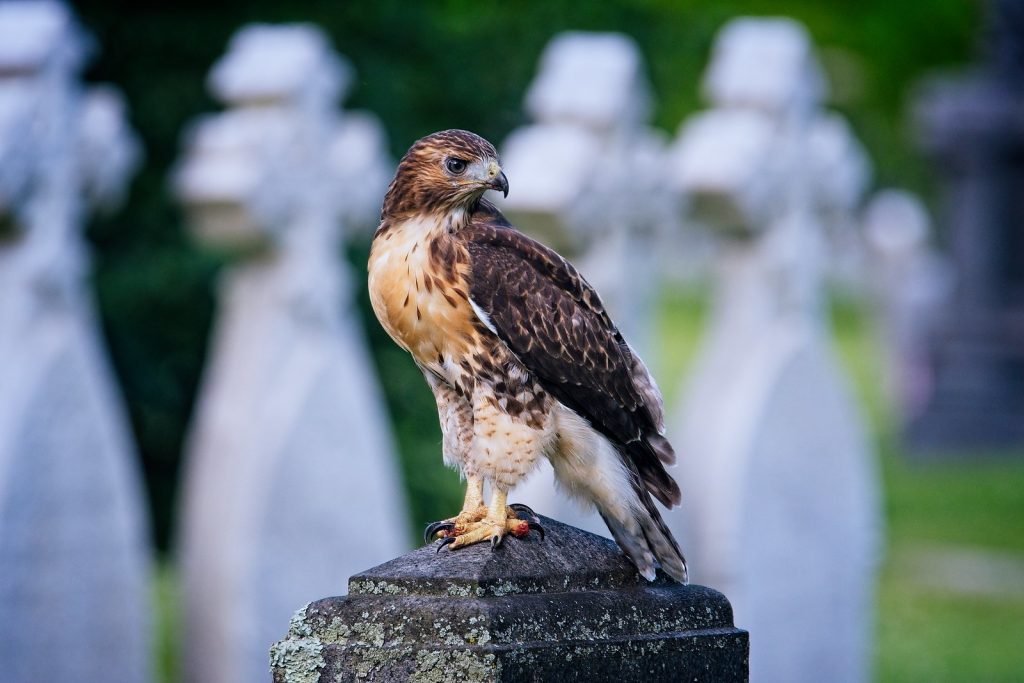
Explore resources and activities that families can use for learning on self-guided visits to Green-Wood. Before you come, please check out our Visit page for information on which entrances to the Cemetery are open each day and visiting hours.
Learn About Nature
Green-Wood is a Level III, nationally accredited arboretum, one of only 27 in the whole country, with over 7,000 trees! We are also home to more than 150 species of birds and many other kinds of wildlife.
Green-Wood Scavenger Hunt
Recommended for ages 4 and up. Younger children will need adult assistance.
Search for natural items as a family! Start from anywhere in the Cemetery.
Curriculum Connections:
● Next Generation Science Standards
■ K-LS1-1. Use observations to describe patterns of what plants and animals (including humans) need to survive.
■ 2-LS4-1. Make observations of plants and animals to compare the diversity of life in different habitats.
Materials:
● A pencil
● Green-Wood Scavenger Hunt PDF (print at home or pick it up at any of Green-Wood’s entrances). Use the Spring and Summer Scavenger Hunt for April-September (available in English or Spanish) or the Fall and Winter Scavenger Hunt for October-March (available in English).
● Optional: binoculars, a magnifying glass, a camera/phone, a notebook, crayons or colored pencils, water, and snacks!
■ If you bring art materials, please make sure not to put any markings on the monuments!
Before your visit:
● Preview the Nature Scavenger Hunt as a family.● Optional: watch the videos on our Alive at Green-Wood page.
● Discuss: what do you expect to find at Green-Wood? What do you not expect to find (think of the time of year)?
● Practice the “two-finger touch” by holding your index and middle fingers together, straight, and gently touching things around your house. This is a great way to touch things in nature without damaging them. Just don’t rub or press too hard!
During your visit:
● Dress in comfortable, closed-toe walking shoes, and bring weather-appropriate layers. Keep in mind it is often a bit windier in the Cemetery than on the streets.● Pick up a Green-Wood Scavenger Hunt at any of our entrances if you didn’t print one at home.
● As you explore, pause to observe small details in nature. Encourage younger children to use their senses (except taste!). Watch, listen, touch, or smell something for a full minute. Does it change as you observe? If you are touching plants or trees, practice the “two-finger touch”. Refrain from picking, pinching, pulling, or hitting anything.
● If you brought a notebook and drawing materials: Record new vocabulary to revisit at home, or draw something you see.
● Take pictures of interesting parts of nature that you are curious about!
● For help identifying things you see, check out these sites:
■ Seek (the kid-friendly version of the inaturalist app)
■ Leafsnap
After your visit:
● Make a memory book of your visit to Green-Wood. Use the pictures you took, or draw some. Write down new words you learned and experiences you had.● If you have a picture of a tree, flower, bird, or anything else you cannot identify, try to figure it out at home! You can also share it with us on social media using the hashtag #GWismyclassroom and we’ll help you out!
Tracking the Seasons
Recommended for ages 9+
Green-Wood is part of a national study on phenology that YOU can participate in!
Phenology is the study of the annual life cycle events of all plant and animal species. These are usually marked by the changing of seasons.
Read on to see how you can become a Citizen Scientist on one or more visits to Green-Wood. This visit can, and should, be repeated multiple times!
Note: This visit requires you to enter through our Main Entrance to access the Valley Water study site.
Curriculum Connections:
● Next Generation Science Standards:■ 5-ESS3-1. Obtain and combine information about ways individual communities use science ideas to protect Earth’s resources and environment.
■ MS-LS1-5. Construct a scientific explanation based on evidence for how environmental and genetic factors influence the growth of organisms.
■ S6b Records and stores data using a variety of formats, such as
databases, audiotapes, and videotapes.
■ S6c Acquires information from multiple sources, such as experimentation, and print and non-print sources.
■ S6d Acquires information from multiple sources, such as print, the Internet, computer databases, and experimentation.
■ S6e Recognizes sources of bias in data, such as observer and sampling biases.
■ S7a Represents data and results in multiple ways, such as numbers, tables, and graphs; drawings, diagrams, and artwork; and technical and creative writing.
■ S7b Argues from evidence, such as data produced through his or her own experimentation or by others.
■ S8b A systematic observation, such as a field study.
Materials:
● Phenology tracker sheet and map for Valley Water. Print one for each person interested in collecting data, or for each person with a Nature’s Notebook account.● Green-Wood’s phenophase photo guide.
● Optional: a pencil, binoculars*, a magnifying glass, a camera/phone, water, and snacks!
Before your visit:
● Read about our phenology project together as a family, or older students can review it alone. Discuss what phenology is, and why studying it matters. Talk about how you’re going to go track phenophases of certain trees at Green-Wood, and then share your data online.● Review Green-Wood’s phenophase photo guide. Cross-reference this guide with the map of trees that are around Valley Water, and focus on what you might see on those trees. Talk about what you expect to find happening with the trees during this time of year. Think about how the weather has been changing lately. Do you think certain phenophases have already happened, or won’t have happened yet? Write down your predictions.
● Create a free account on Nature’s Notebook so you can contribute any data that you collect at Green-Wood.
● Download our phenology tracker sheet and map for Valley Water to use on your visit. These will not be available printed on site.
During your visit
● Dress in comfortable, closed-toe walking shoes, and bring weather-appropriate layers. Keep in mind it is often a bit windier in the Cemetery than on the streets.● Visit Valley Water, which is marked on the map on the phenology project story map.
● Use your phenology tracker sheet to record your observations. Check your phenophase tree guide to make sure you’re tracking the right things.
● Compare your results with your family members. Make sure you all notice the same phenomena. How do your observations compare to the predictions you made?
● Please note: there is another phenology site in Green-Wood, Vista Grove, but the trees will be harder for younger kids to explore. If you do want to explore this site as well, you can download the phenophase tracker here (it’s more complicated). The site is located in the middle of the Cemetery, and you can find it on the map on the phenology project site.
After your visit
● Enter the data you collected into Nature’s Notebook.● Explore data that other Citizen Scientists have collected. What trends do you see? How is climate change impacting the life cycles of trees in urban areas?
Bird Watching at Green-Wood
Recommended for ages 4 and up. Younger children will need adult assistance.
Search for the most common bird species found at Green-Wood this time of year!
Curriculum Connections:
● Next Generation Science Standards
○ 2-LS4-1. Make observations of plants and animals to compare the diversity of life in different habitats.
Materials:
● A pencil.
● Birding at Green-Wood Hunt PDF click here for the spring/summer hunt, click here for the fall/winter hunt). Print at home or pick it up at any of Green-Wood’s entrances.
● Optional: binoculars, a monocular (easier for younger children), a camera/phone, a notebook, crayons or colored pencils, water, and snacks!
○ If you bring art materials, please make sure not to put any markings on the monuments!
Before your visit:
● Preview the birding scavenger hunt as a family:
○ Find out more information about each bird on the hunt online through Cornell University’s ornithology website. Learning about these birds beforehand will help you find them at Green-Wood:
○ Birds on the fall/winter hunt:
● Mourning Dove
● Red-Tailed Hawk
● Red-breasted Nuthatch
● Blue Jay
● Northern Cardinal
● House Sparrow
● Northern Flicker
○ Birds on the spring/summer hunt:
● American Robin
● Palm Warbler
● Red-Tailed Hawk
● American Crow
● Great Egret
● Northern Mockingbird
● Northern Cardinal
● Take a look at a map of Green-Wood: Think about where you want to walk to find different birds. Great Egrets like water, Northern Cardinals nest in shrubs and tangled vines. Plan a route that will take you to at least one of our glacial ponds.
● Optional: watch the video on our Alive at Green-Wood page called “Wildlife at Green-Wood”.
● Talk about bird watching etiquette with your student(s). It will be important to be quiet, not get too close to birds you spot, and not try to touch or feed any wildlife, birds included.
● If you see a bird that you think might be injured, leave it alone and notify Green-Wood security or call Kings County wildlife rehabilitator Theresa M Cervera at 917-612-9374 or theresa_cervera@nps.gov. Do not touch or try to feed it.
● If your student(s) are very new to birding, check out this article from the Audubon Society on getting kids into birding.
During your visit:
● Dress in comfortable, closed-toe walking shoes, and bring weather-appropriate layers. Keep in mind it is often a bit windier in the Cemetery than on the streets.
● If you choose, you may leave flowers or other living plant materials in remembrance of any individual in the Lots.
● Pick up a Birding at Green-Wood Hunt at any of our entrances if you didn’t print one at home.
● As you explore, make sure you’re looking in trees, on the ground, in shrubs, and near water for different birds. Keep fairly quiet and stand as far away as possible from wildlife in order to observe them.
● If you brought a notebook and drawing materials, sketch anything in nature that you find interesting.
● Take pictures of interesting parts of nature that you are curious about! If you find a bird not on our list that you want to identify, create a free account with E-Bird, Merlin Bird ID, Inaturalist, or Seek (a kid-friendly version of Inaturalist). These allow you to take pictures of what you see and identify birds in the moment. Be prepared to list where you found the bird when you enter a sighting into one of these apps.
After your visit:
● Make a memory book of your visit to Green-Wood. Use the pictures you took, or draw some. Write down new words you learned and experiences you had.● Share your favorite bird pictures with us on social media using the hashtag #GWisMyClassroom!
Art and Architecture
Stories in Stone
Recommended for ages 7 and up.
Explore the symbols on gravestones and learn their meanings! This can be done anywhere in the Cemetery.
Green-Wood is part of a national study on phenology that YOU can participate in!
Phenology is the study of the annual life cycle events of all plant and animal species. These are usually marked by the changing of seasons.
Read on to see how you can become a Citizen Scientist on one or more visits to Green-Wood. This visit can, and should, be repeated multiple times!
Note: This visit requires you to enter through our Main Entrance to access the Valley Water study site.
Curriculum Connections:
● National Visual Arts Standards
■ NA-VA.K-4.4 Understanding the visual arts in relation to history and cultures
■ NA-VA.K-4.5 Reflecting upon and assessing the characteristics and merits of their work and the work of others.
■ NA-VA.K-4.6 Making connections between visual arts and other disciplines.
Materials:
● Stories in Stone scavenger hunts (choose hunt #1, hunt #2, or both!)● Pencil
● Optional: notebook and art materials (crayons and colored pencils are preferred to markers in the Cemetery. Please make sure not to put any markings on the monuments!)
Before your visit:
● Parents, talk with your child about what a symbol is. A great definition is “something that stands for something else.”
● As a family, look for some symbols in your home. Common examples: eagle on a dollar bill, a cross or other religious symbol, or look out your window at a crosswalk: talk about how the orange hand and white walking figure are symbols for stop and go. Look at pictures of buildings on the internet that have symbols related to their purpose. For example, courthouses often have the scales of justice carved into their facades. Break down what the symbols are, what they stand for, and why they are useful.
● Why useful: sometimes it’s easier to understand images than words. For example, if you are in a country where you don’t speak the language but you need a doctor, you might look for a symbol of a short red cross, or a mortar and pestle to symbolize a pharmacy. Images can communicate meaning to form a common, quick language between different people.
● Talk about how when people die, their loved ones often put up decorative stones (at Green-Wood we call them “monuments”) to mark their gravesites and tell something about them. Often, these monuments include symbols of things that were important to the deceased person, or symbols that say something about the deceased person’s character or values.● Try inventing a symbol of your own! What’s a personal quality or value that is important to you? Love? Honesty? Bravery? Have you and your child choose a quality or value in secret and draw a picture to symbolize it. After you finish your drawings, show each other your symbols. See if you can guess what the other person’s is and what it means. Or just have the other person describe what they created.
● Preview that you’re going to go on a hunt for interesting symbols on monuments at Green-Wood!
● Print out the Stories in Stone scavenger hunts at home (linked above, under materials). They will not be available on-site at Green-Wood.
● Note for parents: Green-Wood contains a lot of graves of children and babies. This is because of our age—we’ve been burying people since 1840, and some reburials at Green-Wood are even older. It may help your child to know that child mortality (the rate of children dying from birth to age five) is very rare today but was extremely high in the U.S. until the 1940s when antibiotics and other life-saving medicines, like vaccines, became more widely available. Most of the children buried at Green-Wood long ago died of illnesses that the vast majority of kids today would survive (like the flu, or diarrheal diseases). On rare occasions, the cause of death might be stated on childrens’ grave and your child may recognize those illnesses (pneumonia, for example). Decide whether or not you want to preview for your children that they will likely see these graves at Green-Wood and in fact some symbols on their sheets are specific to child graves. Read the scavenger hunts before your child does. You may decide to black out certain symbols with a sharpie—but keep in mind it may be hard to avoid your child noticing the graves of very young people as they are all over the Cemetery.
During your visit:
● Dress in comfortable, closed-toe walking shoes, and bring weather-appropriate layers. Keep in mind it is often a bit windier in the Cemetery than on the streets.● Enter the Cemetery at any open entrance. Make sure to check our website to find out when different entrances open and close each day.
● Stroll around and look for the symbols on your sheet(s)! Or find a monument you like and see if it has a symbol on it.
● Are some symbols more common than others? Why might that be? Look for dates on the monuments. Do monuments that were created around the same time tend to share certain symbols or other qualities? How about the monuments that are all related to members of the same family—how do their symbols compare?
● If you have a notebook, draw symbols you want to remember. Or take pictures of them!
● Which symbols do you like the best? Which have a special meaning to you? What emotions do they make you feel?
After your visit:
● Keep talking about the symbols you saw! Go over your drawing or pictures. Share your memories with family members who didn’t come with you. Send us a picture on social media using the hashtag #GWismyclassroom and tell us what you saw and what it meant to you!● Write notes with a family member using a secret symbol code. Use ones from the hunts or make up your own.
American History
Over 570,000 people whose lives spanned three centuries are now permanent residents of Green-Wood. Make a special visit to the Cemetery to learn about the life stories of some of them, as well as some historic sites within Green-Wood.
Exploring the Freedom Lots
Recommended for ages 10 and up.
Green-Wood staff recently discovered that in the nineteenth century, an entire section of our cemetery was reserved for African Americans, even though the Cemetery was not segregated as a rule.
Under the guidance of our director of restoration and preservation, a team of high school students brought this special area, the largest undisturbed Black burial ground north of the Mason-Dixon line, back to life. Learn about the Freedom Lots online and then visit!
Curriculum Connections:
● New York State Social Studies Framework Practices (Grade 6-8)
● Gathering, Interpreting, and Using Evidence
1. Identify, effectively select, and analyze different forms of evidence used to make meaning in social studies (including primary and secondary sources such as art and photographs, artifacts, oral histories, maps, and graphs).
● New York State Social Studies Framework Practices (Grade 7-8)
● Gathering, Interpreting, and Using Evidence
1. Define and frame questions about the United States that can be answered by gathering, interpreting, and using evidence.
2. Identify, select, and evaluate evidence about events from diverse sources (including written documents, works of art, photographs, charts and graphs, artifacts, oral traditions, and other primary and secondary sources).
3. Analyze evidence in terms of historical context, content, authorship, point of view, purpose, and format; identify bias; explain the role of bias and audience in presenting arguments or evidence.
Materials:
● Device to view the Freedom Lots story map while at Green-Wood.● Optional: paper and pencil
Before your visit:
● Explore our Freedom Lots project on our website
● Watch this video on the project made by The New Yorker, and read the accompanying article.
● Optional:
● Learn more about life for nineteenth-century Black New Yorkers:
● Part 1: Carla L. Peterson on Black History in 19th-Century New York
● Part 2: Carla L. Peterson on Black Life in 19th-Century New York
● Part 3: Carla L. Peterson on Black Life in 19th-Century New York
● Part 4: Carla L. Peterson on Black Life in 19th-Century New York
● Learn more about the Colored Orphan Asylum:
● Colored Orphan Asylum-MAAP project, Columbia University
● The New York Draft Riots and the burning of the Colored Orphan Asylum, The New-York Historical Society
● Remembering a Vile Civil War Act, on Fifth Avenue, The New York Times
● Learn more about Black soldiers in the American Civil War:
● Black Soldiers in the U.S. Military During the Civil War, Library of Congress
● Black Soldiers in the Civil War, American Battlefield Trust
During your visit:
● Dress in comfortable, closed-toe walking shoes, and bring weather-appropriate layers. Keep in mind it is often a bit windier in the Cemetery than on the streets.
● If possible, enter the Cemetery through our Sunset Park Entrance at 35th Street and Fourth Avenue.
● Walk to the Freedom Lots (security can help you find it), by hugging the border of the Cemetery as you walk south.
● Visit the graves outlined on the map on the Freedom Lots project page, and read the background information on each monument. Explore the additional resources about each person.
● Optional: In a notebook, make a three-column table. From left to right, label the columns KNOW, INFER, and WONDER. At each monument, discuss as a family what you know, infer and wonder about each person just from looking at their monument. Then consider the information on our website, particularly the primary source evidence we link to. How does each source add to your understanding about this person’s life? What questions about each person do you still have? How might you do further research to learn more?
● Discuss as a family: How do you feel these people should be remembered today? Would you change the information on their monuments?
● If you choose, you may leave flowers or other living plant materials in remembrance of any individual in the Lots.
After your visit:
● Write about your visit. What was it like to see the Freedom Lots in person? How did they compare with other areas of the Cemetery that you saw?● Draw a memorial that you would place in the Freedom Lots. Think about how you feel the people buried there should be remembered today.
● Send us pictures of your visit on social media using the hashtag #Green-WoodisMyClassroom
Suffragists of Green-Wood
Recommended for ages 9 and up.
Learn about suffragists buried at Green-Wood by visiting their graves and reading about them, then do a couple of artistic activities.
Curriculum Connections:
- NYC Social Studies Scope and Sequence
- 4.5b Expanding Women’s rights
- 8.2e The Progressive Era
- 11.4b Women and Equality
Materials:
- Suffragists of Green-Wood packet
- Pencil or colored pencils (please bring your own)
- If you bring art materials, please make sure not to put any markings on the monuments.
- Optional: clipboard (please bring your own)
Before Your Visit:
- Define the word suffrage at home. Discuss who in your home has the right to vote today. Who would have had that right before 1920 when the 19th amendment was passed? Who would have had that right before 1870 when the 15 th amendment gave Black men the right to vote?
- For a deep dive, check out this timeline of voting rights in the United States.
- Ask what they know about the 2020 elections. Ask if they know who was running for office, and if the adults in their lives voted. If they went with them to vote at some point, what was that like? What do students think of the voting process? Do they plan to vote when they are older? Why or why not?
- Tell students today they will learn about 19 suffragists, or women who worked to win the right to vote, who are buried at Green-Wood.
- Tell them that these women did not all live at the same time. Most overlapped a little, but they represent at least three generations of women who played a role in getting women to have the right to vote.
- Preview the glossary on page 5 with students. Make sure they realize that women worked in different ways and through different organizations to earn the right to vote. Suffragists didn’t always agree about their goals or how to achieve them.
During Your Visit
- Start your tour! Check the map to find any grave you are near to. You don’t have to go in order at all, and you shouldn’t feel compelled to visit all 19 monuments. Note that there are GPS coordinates for each monument to help you find them.
- When you get to each monument, read the bio for the suffragist. Then look at her monument. How big is it? How much detail about her life is on it? Would students change it if they could? What more would students like to know? How could you find out more?
- Start your tour of each gravesite from any entrance to the Cemetery. There is no correct order to follow.
- After you’ve located all the graves you wish to visit, give students some time to sit and do the monument design or vote button design activities.
- Ask students to consider how each of the women contributed to the cause for women’s suffrage. Were they writers, marchers, organizers? How could their skills and contributions be symbolized on a monument?
- For the voting button, they can decide to design a historical button about votes for women or just a general one for the present urging people to vote.
After Your Visit
- Share your work with us by tagging #Green-WoodisMyClassroom!
Free Self-Guided Materials for Learning at Home
There are so many ways to explore Green-Wood without ever leaving your couch! Check back here soon for fun, educational activities to do at home.
History
Mapping the Battle of Brooklyn
Curriculum Connections:
● New York State Social Studies Framework (Grade 4)
o A. Gathering, Interpreting, and Using Evidence
■ Develop questions about New York State and its history, geography, economics and government.
■ Recognize, use, and analyze different forms of evidence used to make meaning in social studies (including sources such as art and photographs, artifacts, oral histories, maps, and graphs).
o D. Geographic Reasoning
■ Use location terms and geographic representations, such as maps, photographs, satellite images, and models, to describe where places are in relation to each other, to describe connections between places, and to evaluate the benefits of particular places for purposeful activities.
● Social Studies Scope and Sequence
o Grade 4, Unit 3: Colonial and Revolutionary Periods
Materials:
● Map of 13 colonies
● Map of colonial New York City and Brooklyn
● Green-Wood’s Battle of Brooklyn Map
Introduction:
● Ask students what they know about soldiers who fought in the American Revolution (if they have previous knowledge).
● After assessing prior knowledge, fill in the gaps: most of Washington’s army were volunteers with no experience. They were local young townsmen, businessmen and farmers as young as sixteen years old. Many of them experienced battle for the first time during the Revolutionary War. Weaponry, supplies, and food were also limited for soldiers—unless you were a wealthy gentleman. Many came to fight with whatever they had on hand. The officers leading the army were also fairly inexperienced. The army had no standard uniforms or equipment and because of limited resources, the Continental Congress often could not get what they needed to resupply the troops in the field. Because of all these issues the Continental Army faced supply shortages and soldiers deserting or dying, not in battle, but because of bad weather, starvation, or while being held captive by the British.
Exploration:
● This is largely who made up Washington’s army when he was trying to defend New York and Brooklyn. Ask students: Why was New York so important to defend? Show them a map of the thirteen colonies and ask them to think about where New York is located and what it is connected to (have them note rivers, like the Hudson, connecting it to upstate, proximity to the ocean, and that it is right in the middle of the colonies).
● Tell students: because General George Washington knew he had fewer and less experienced troops and more limited supplies than the British Army, he wanted to be very strategic about how he used his troops to defend New York. He knew the British wanted to take New York City because of the reasons we just came up with (so they could use its ports to efficiently reach other colonies and cut off communication between northern and southern colonies). Washington saw the key to protecting Manhattan, and thus the Hudson, was controlling Brooklyn Heights which would allow them to protect Lower Manhattan by aiming cannons from Brooklyn across the East River to Manhattan. To control Brooklyn Heights, he had to defend Gowanus Heights, which was a thickly wooded ridge running northeast/southwest along the western edge of Long Island (including current the Brooklyn sites of Brooklyn Botanical Gardens, Prospect Park, and The Green-Wood Cemetery). Washington only had 3,300 new and poorly armed troops to hold off the
British fleet which had over 30,000 troops that were gathering by Staten Island. Show map of colonial New York City and Brooklyn to illustrate
Washington’s strategy.
● Let’s examine a map of the Battle of Brooklyn to figure out if Washington’s plan worked.
● Have students gather, ideally, red and blue colored pencils, markers, or crayons. One of each color. If they can’t find these colors, have them find two others but they will need to remember that one color will always correspond to the red/British on the map, and one will always correspond to the blue/Continental Army.
● Have students examine the map of the progress of the Battle of Brooklyn. Ideally, this map is printed out in color. If the map is printed in black and white, students will need to keep a color image up on screen. If they can’t print the map at all, they’ll need to trace the colored lines with their fingers and point to things on-screen.
● Review the map key with students. Make sure they understand what all the symbols mean.
● Go through each step of the activity and ask students the questions that go along with each step.
Activity:
● Step 1: Find the British flags on the map and circle with your red colored pencil. How many British flags are there?
● Step 2: Find the American flags and circle with your blue colored pencil. How many are there? Why do they look different from what you might be familiar with? (This is what the flag of the 13 colonies looked like in 1776, it wasn’t until a year later that the stars were added!)
● Step 3: Find the British ships on the map and circle them in red. Where are the British entering Brooklyn?
● Step 4: Find the blue dashed lines and trace with your blue colored pencil.
● Step 5: Find Washington and the American forts on the map and circle them in blue. This is where the American camps were that Washington was trying to defend.
● Step 6: Find all the red dashed lines on the map and trace with your red colored pencil. Do you see more red or blue on the map? Why do you think the British had so many different marching paths? (The British were surrounding the American troops and trying to catch them by surprise by coming from many different directions.)
● Step 7: Find The Green-Wood Cemetery (Hint it’s the green colored area on the map). Although The Green-Wood Cemetery was not established until well after the battle was fought, part of the battle was fought right where the Cemetery was later made.
● Step 8: Discuss how you think the battle played out. Based on what you see on the map, who do you think was better prepared for the battle? Why? (Find clues on the map! Hint: Do you see more red lines or blue lines?) Is there anywhere on the map where the British were not stopped or fought by Americans? Look for the northernmost path the British took across Jamaica pass. There were only five American soldiers stationed there and they were not able to defend it against the 10,000 British soldiers marching toward them. Who do you think won the battle? Why?
Wrap Up
● Confirm for students the outcome of the battle:
o When the Americans realized they were surrounded they retreated and were able to escape in the middle of the night, mostly because a fog rolled in and shielded their retreat to northern Manhattan. If the British had attacked again at night, many scholars believe the whole war would have ended right there, almost before it had begun. When the British did try to attack again in the morning, Washington’s army was gone. For the rest of the Revolutionary War, New York was under British control.
● Some other curious things about this battle: why did the British attack through Brooklyn instead of in Manhattan as Washington had predicted? One of the reasons the British landed in Brooklyn was because Brooklyn was largely farmland—use the map to show this to students—do we see any buildings, or do we mostly see trees and farmland? Because there was a lot more farmland here than in Manhattan, and because the local farmers were loyal to the British, the British chose to invade Brooklyn instead of Manhattan. They wanted the food from the farms to help feed their soldiers and wanted to capture Brooklyn in order to take control of the New York Harbor. Also, they wanted to catch the Americans by complete surprise.
● Review with the students what they learned about the Battle of Brooklyn.
Exploring the Freedom Lots
Curriculum Connections:
New York State Social Studies Framework (Grade 6-8)
Gathering, Interpreting, and Using Evidence
1. Identify, effectively select, and analyze different forms of evidence used to make meaning in social studies (including primary and secondary sources such as art and photographs, artifacts, oral histories, maps, and graphs).
New York State Social Studies Framework Practices (Grade 7-8)
Gathering, Interpreting, and Using Evidence
1. Define and frame questions about the United States that can be answered by gathering, interpreting, and using evidence.
2. Identify, select, and evaluate evidence about events from diverse sources (including written documents, works of art, photographs, charts and graphs, artifacts, oral traditions, and other primary and secondary sources).
3. Analyze evidence in terms of historical context, content, authorship, point of view, purpose, and format; identify bias; explain the role of bias and audience in presenting arguments or evidence.
Materials:
● Notebook and pencil or computer for typing
Introduction:
● Have students explore and read the introduction to the Freedom Lots on the Freedom Lots story map online.
● Make sure they understand the history of the Freedom Lots: In the nineteenth and early twentieth centuries, this section of the Cemetery was known as “The Colored Lots.” Over 1,300 African Americans were laid to rest in this area. Today it is known as The Freedom Lots, a name proposed by Green-Wood’s high school interns to restore respect to those buried there. It is one of the largest existing burial grounds for African Americans who lived in New York City in the last two centuries. While Green-Wood’s records show no evidence of an official policy specifying that these seven lots were for African Americans exclusively, it’s clear that the individuals buried here were segregated in death as they were in life. By researching the people buried in The Freedom Lots, we can connect their stories to historical events and begin to understand how history is recorded, who records history, who is remembered, and whose stories were never told.
● Additional resources:
o At this link, watch this video on the project made by The New Yorker and read the accompanying article.
o Explore more stories about life in the nineteenth century for Black New Yorkers at the Black Gotham Archive
Exploration:
● Optional: In a notebook, make a three-column table. From left to right, label the columns KNOW, INFER, and WONDER. For each source this use this to discuss what you know, infer, and wonder about each person.
● Using the Freedom Lots story map online, explore the stories of:
o John Munroe
o Lucinda Williams
o Association for the Benefit of Colored Orphans
o Rufus Cliff
o Stephen Little
● Have students read the background information on each person and examine the photograph of their monument.
● Write out what you know, infer, and wonder just from looking at their monument.
● Then look at the primary sources linked on the website. Discuss as a group: How does each source add to your understanding about this person’s life? What questions about each person do you still have? How might you do further research to learn more?
● Ask students: How do you feel these people should be remembered today? Would you change the information on their monument or change their monument all together?
Learn more about Black Soldiers in the American Civil War:
● Black soldiers in the U.S. Military during the Civil War, National Archives
● Black Soldiers in the Civil War, American Battlefield Trust
Learn more about the Colored Orphan Asylum:
● Colored Orphan Asylum, MAAP Project, Columbia University
● The New York Draft Riots and the burning of the Colored Orphan Asylum, The New-York Historical Society
● Remembering a Vile Civil War Act on Fifth Avenue, The New York Times
Activity:
● Think about the different people you learned about who are buried in the Freedom Lots and pick one to re-memorialize. How do you think this person should be remembered today? What parts of their life would you like to share on their monument?
● Design a memorial or monument for one person you learned about that shares a part of their life and helps us remember who they were, incorporating words and pictures.
● Share your work with your class, your family, or even with Green-Wood! Post what you created to Instagram using the hashtag #GreenWoodIsMyClassroom.
Honoring Our Everyday Heroes
Curriculum Connections:
SOCIAL STUDIES SCOPE & SEQUENCE
Grade 1
UNIT 3: The Community
1.3 A citizen is a member of a community or group. Students are citizens of their local and global communities. (Standard 5)
● Citizens are members of their own community
● Citizens protect and respect their own communities
● Community workers (police, teachers, etc.) respect the rights of citizens
UNIT 4: Community Economics
1.10 People make economic choices as producers and consumers of goods and services.
(Standard 4): Community Workers 1.10b, 1.10c (Standards 4, 5)
● People in the community have different jobs (teachers, truck drivers, doctors, government leaders, etc.)
● Community workers use tools and resources to provide services in a community
● Community workers are diverse and work with one another
● People in the community help their neighbors in emergencies
● Communities develop new needs and resources, jobs
Grade 2
UNIT 4: Rights, Rules and Responsibilities
2.9 A community requires the interdependence of many people performing a variety of jobs and services to provide basic needs and wants. (Standards 4, 5)
● There are goods and services specific to New York City
● Community resources provide communities with services (library, hospital, playground, etc.)
● Members of a community specialize in different types of jobs that provide services to the community (fire fighters, police officers, sanitation workers, teachers, etc.)
● Communities share services and resources with other communities
Materials:
● Biographies below
● Paper, pencil, coloring materials
Introduction:
● Introduce some vocabulary: community, citizen. Make sure your student understands that you’ll be talking about what makes someone a good citizen today, and how some citizens have special roles in their communities—helping people lead healthy, safe, and happy lives.
● Today, you’ll learn about some everyday heroes from the past, and get inspired to honor a community citizen today.
● Note about the coronavirus: this lesson does not require that you inform your student any more about the current pandemic than you already have. We focus on many different types of community helpers, so it is possible to avoid the topic of the virus entirely if you prefer; however, if you plan to honor a healthcare worker today and are looking for resources on how to talk to kids about the virus, check out this article from the CDC.
● Ask students to brainstorm what makes a good citizen. Who in the community helps everyone be safe and healthy?
● Tell students: now we’re going to learn about a few people from the past who helped their communities.
Exploration:
● Read the following bios on everyday heroes who are buried at Green-Wood and look at images of their monuments. After reading these bios and examining the monuments, ask:
● Why do you think they did what they did?
● What obstacles did they face?
● Why did they persevere?
● What does their monument tell you about their lives?
● Here are some amazing everyday heroes who are buried at The Green-Wood Cemetery:
● Abby Hopper Gibbons, Civil War nurse
● William Hallock Park, doctor and disease expert
● Sarah Jane Smith Garnet, educator and suffragist
● Harry Howard, firefighter
● Isabella Seaholm, police detective
Activity:
● Think of an everyday hero you care about. It can be someone you know or a stranger. How do they help your community? Think about why you would like to honor or thank them. Draw a picture, write a card, or make a poster to honor and thank them.
● Here’s an example of how to do this from Children’s Museum of the Arts
Wrap-Up:
● Talk about why it’s important to thank the heroes in your community and honor them.
● Share your work honoring an everyday hero with your class, your family, or even with Green-Wood! Post what you created to Instagram using the hashtag #GreenWoodIsMyClassroom.
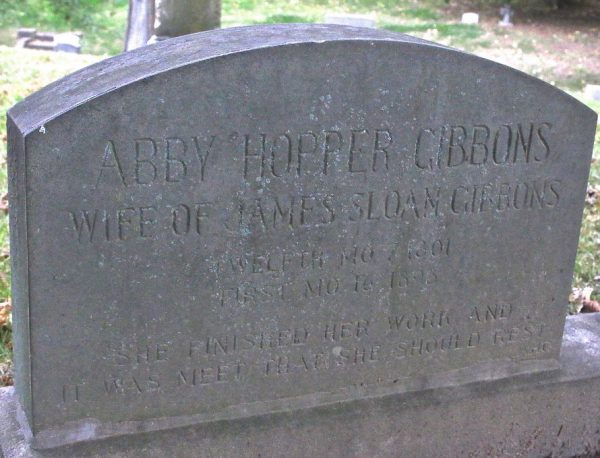
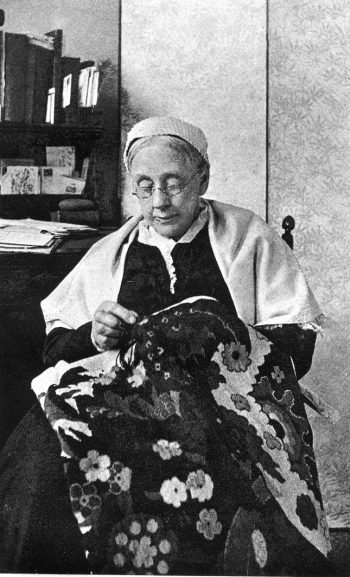 ABBY HOPPER GIBBONS (1801–1893)
Abby Hopper was born in 1801 to a religious Quaker family that believed in helping their community. When Abby grew up, she worked in Quaker schools, a profession she continued after she got married to James Sloan Gibbons, a fellow Quaker, in 1833. Throughout their lives, the couple were leaders in a variety of social and political causes, such as the fight to end slavery, improving the conditions of prisons, and aiding the poor.
Abby and her family were abolitionists, meaning they fought for the immediate end of slavery. They took this fight very seriously. They even stopped being a part of their church’s congregation because their religious community thought the Gibbons’ antislavery views were too extreme.1 Abby and her husband also sheltered people who had escaped slavery in their home. In fact, their home was one of the “stations” on the Underground Railroad (a system of people and safe, secret places that helped people escape slavery, not an actual railroad) in New York City. Because they were widely known abolitionists, Abby and her family’s home was attacked by a hate-filled white mob in July 1863 during what are today known as the Draft Riots. Abby and her family escaped but their home was very damaged.2
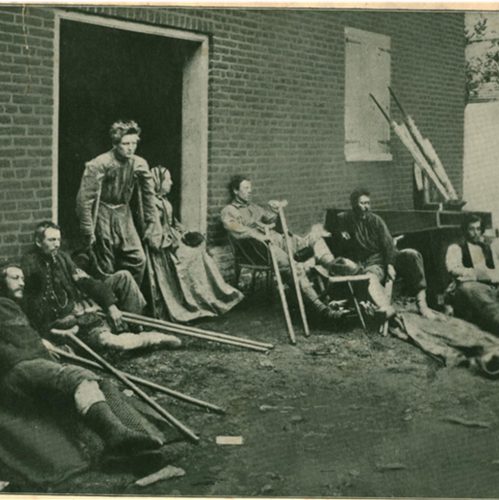
When the Civil War broke out in 1861, Abby was sixty years old. But she wasn’t done working. She and her daughter Sarah Emerson Gibbons signed up to be nurses—work they did for the next three years. Being a nurse during the war was very hard work. Abby had to travel into the South to small towns and cities near where battles took place. She had to work in terrible conditions, helping wounded and sick soldiers survive in makeshift hospitals in fields or old buildings. Writing in a letter about an experience she had in Fredericksburg, Virginia she wrote, “The whole town is filled with wounded. House after house, store after store, filled with men lying on the floor. I have about 160. We see nothing but frightfully wounded men.”3 She had to work with limited supplies.
She had to provide help and comfort even to soldiers fighting for the Confederacy, whose values were against her own (Abby supported the Union).
 1 “Abby Hopper Gibbons Family Papers, 1824-1992,” Friends Historical Library of Swarthmore College (Swarthmore College ), accessed May 6, 2020, http://www.swarthmore.edu/library/friends/ead/5174ahgi.xml
2 Virginia Kurshan and Theresa Noonan, “Lamartine Place Historic District Designation Report” (New York City Landmarks Preservation Commission, 2009), pp. 9-18
3 Abby Hopper Gibbons, Life of Abby Hopper Gibbons: Told Chiefly through Her Correspondence, ed. Sarah Hopper Gibbons Emerson (New York: Putnam, 1896)
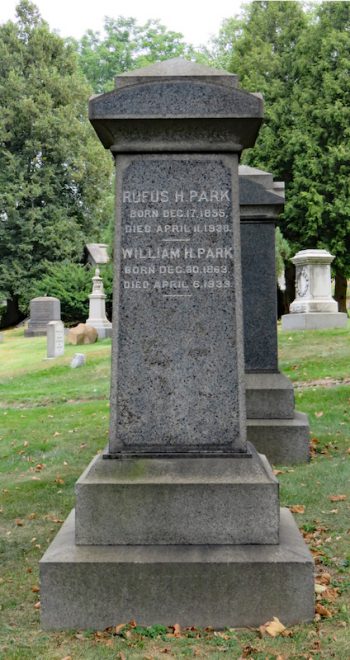
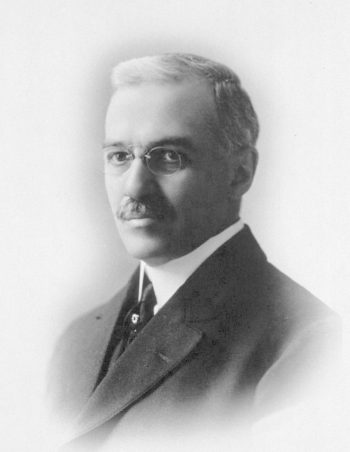 WILLIAM HALLOCK PARK (1863–1939)
Dr. William Hallock Park was a special kind of doctor called a “bacteriologist” who studied what makes people get sick and how to prevent diseases. His work focused on diphtheria, a deadly disease that is extremely rare today in the United States thanks in large part to Dr. Park.
In the 1800s when Dr. Park started his career, people were just starting to understand what caused diseases: germs. With so little understanding of how these invisible microbes made people sick, people could not develop effective medicine to treat diseases, or vaccines, which prevent people from getting a disease in the first place. But that began to change just as Dr. Park was getting out of medical school. Right after graduating he began studying the disease diphtheria, which was a particular danger to children in his time, and helped discover and identify the germs that cause it. Dr. Park then went on to work for the New York City Department of Health. Under Park’s leadership, the city was able to begin producing vaccines for diphtheria during an outbreak in the city in 1894. But this wasn’t enough to stop the disease. There were not nearly enough vaccines and they were very expensive to produce. In 1914 Park’s lab made a new discovery and found a way to produce a new vaccine. This led to greatly reducing the cases of diphtheria in New York. According to Park, “All this work lowered the diphtheria death-rate from 150 per 100,000 in 1895 to less than one per 100,000 in 1936.”1
Diphtheria was not the only disease Dr. Park would try to conquer. His efforts, and those of scientists who worked with him, made great progress in the control of scarlet fever, tuberculosis, influenza, and other contagious diseases and led to him being called “the family doctor to New York City’s millions” by Yale University.2 Under Park the Health Department also took on another deadly risk to children: milk. In his era, milk was often riddled with bacteria because it was not handled safely on farms and farmers added dangerous ingredients to it to hide a bad taste or color. This bacteria-ridden milk caused many children to get sick, and some to die, especially in the hot summer months. Because of Dr. Park’s research on improving milk safety, by 1905 all milk sold in the city had to be inspected by the Health Department and by 1914 milk had to be pasteurized, a process that kills bacteria.3
William Park dedicated his life to fighting diseases and helping children in New York City be healthier and safer. He was still working in his laboratory until the end of his life and died on April 6, 1939 at 76 years old.
 1 Morris Schaeffer, “William H. Park (1863-1939): His Laboratory and His Legacy,” American Journal of Public Health 75, no. 11 (November 1985): pp. 1299, https://ajph.aphapublications.org/doi/pdf/10.2105/AJPH.75.11.1296.
2 Dr. W. H. Park Dies; Health Authority,” The New York Times, April 7, 1939, p. 21, https://nyti.ms/2zi9TnW.
3 Schaeffer, “William H. Park”, 1299.
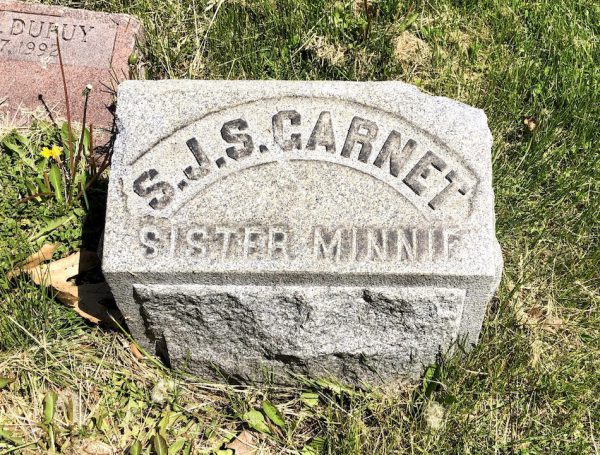
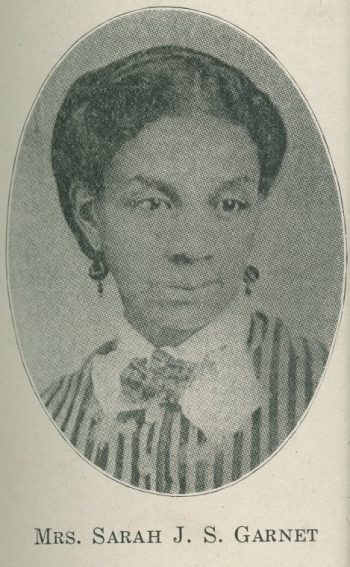 SARAH J. THOMPSON GARNET (1831–1911)
Sarah Garnet grew up in Brooklyn in a community called Weeksville, in what is now Crown Heights. Weeksville was founded as a free black community in 18381, and Sarah’s parents were some of the first to move there. This community supported and promoted black professional careers and established their own churches, schools, businesses, doctors, aid societies, orphanages, and elderly homes. Growing up in Weeksville, Sarah and some of her siblings were encouraged to pursue an education and would have seen many other black men and women becoming skilled professionals in their fields.
Sarah was educated at a young age by her grandmother and then went to public school in Manhattan. At fourteen she stood out in her school and began working as a monitor, helping teachers instructing other students in the school. Sarah’s passion for teaching continued and she began her career in education. When she began teaching in 1854 in Williamsburg, Brooklyn, public schools were just beginning to grow as a way to educate New York City’s children. But it still wasn’t required or enforced that all kids go to school, so some kids stayed home and worked with their families or got jobs at young ages. It wasn’t until 1894 that a law was passed to require all children aged 6-14 to attend school for a certain portion of the school year.2 So, during Sarah’s career she likely saw poor attendance by many students who were expected to be home helping their families. In 1863 Sarah became the first black principal of an integrated public school in New York when she began working at Grammar School No. 4. She later worked as the principal of Public School No. 80.3 Teaching at an integrated school meant that black students and white students, as well as students of other races, all learned together in the same classrooms, but that was not always the case in New York. Many of the first free schools in New York City in the nineteenth century were segregated, meaning they only taught white students, or only taught black students.4
Growing up Sarah saw her father advocate for African American voting rights, and she eventually would do the same for black women. Sarah believed women had the “same human intellectual and spiritual capabilities as men,” which is why she believed they too should be able to vote.5 The suffrage movement of the time was fighting for women’s right to vote, but many white women in the movement excluded black women. So, in the late 1880s Sarah founded the Colored Women’s Equal Suffrage League of Brooklyn. She and her sister, Susan McKinney Steward, who was the first black female doctor in New York, and many others fought for their inclusion as black women in the voting rights movement. In fact, the League became so popular that it outgrew Sarah’s living room, where they initially held their meetings, and had to meet at the YMCA.
Sarah dedicated her life to teaching and fighting for the rights of African Americans and women. She fought not only for suffrage but also for equal pay and an end to race-based discrimination until she died in 1911.
 1Cassandra Zenz, “Weeksville, New York (1838- ),” Blackpast , October 14, 2010, https://www.blackpast.org/african-american-history/weeksville-new-york-1838/.
2James D Folts, “History of the University of the State of New York and the State Education Department 1784 – 1996,” NYSED (New York State Library, 1996), http://www.nysl.nysed.gov/edocs/education/sedhist.htm#univ.
3Susan Goodier, “Biographical Sketch of Sarah Jane Smith Thompson Garnet,” Alexander Street (Alexander Street, 2007), https://search.alexanderstreet.com/view/work/bibliographic_entity%7Cbibliographic_details%7C3911200.
4Andy McCarthy, “Class Act: Researching New York City Schools with Local History Collections,” The New York Public Library, October 20, 2014, https://www.nypl.org/blog/2014/10/20/researching-nyc-schools.
5 Goodier, “Biographical Sketch of Sarah Jane Smith Thompson Garnet”.
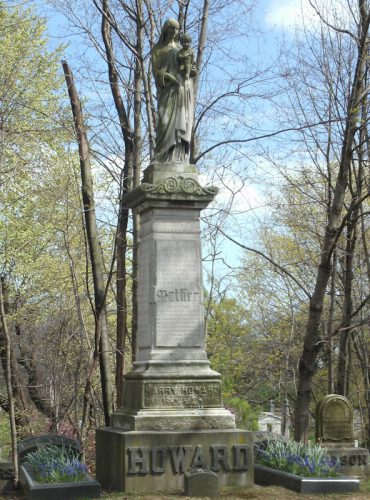
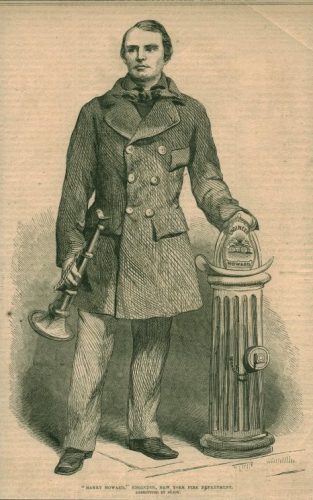 HARRY HOWARD (1822–1896)
Harry Howard was one of New York’s most famous fireman of his time. He was born in Manhattanville, New York and as an infant, he was abandoned and mysteriously left to Sarah Howard, who adopted Harry and gave him his name.
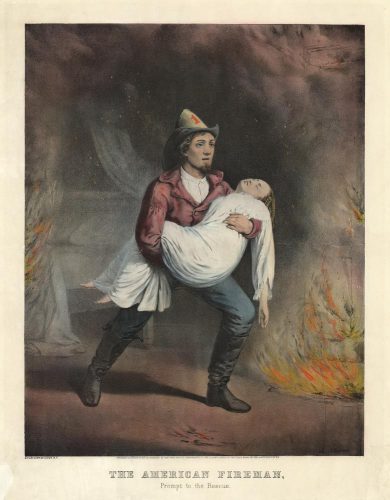
Harry was interested in firefighting from a very young age. Firefighting was very different in the 1800s than it is today: when Harry started out, firefighters were all volunteers. Their fire engines had to be pumped by hand. Rival companies competed to be the first to get to a fire and put it out. Sometimes companies even had fist fights with each other! Still, firefighters were heroes to many, especially young children.
At the age of thirteen, Harry became a “runner.” Runners were assigned to run through the streets ahead of the fire engine, clearing the path for the engine to get through. When he was seventeen, he finally joined the Peterson Engine 15 company as a volunteer and began his career. In 1854, after a massive fire at the Jennings Clothing Store, where eleven firemen lost their lives, he was recognized for his bravery by the Common Council of New York. The Council funded a full-length portrait of Harry and placed it in City Hall. The portrait is now on exhibit at the FDNY Museum on Spring Street in Manhattan.
In 1857, Harry was named chief engineer for the Fire Department. As chief engineer, he introduced the permanent alert system, which required firefighters to sleep in bunkrooms at fire houses, so they were ready to respond to alarms of fire at all hours. Unfortunately, he was not able to hold the position of chief engineer for very long. A year after he assumed leadership of the Volunteer Fire Department, he was on his way to a fire on East Houston Street when he was struck down by paralysis. Though he survived, he never recovered his strength and had to resign from the department in 1860.
Although he could no longer fight fires himself, this didn’t stop Harry from fighting for the rights of other firefighters. After the department transformed from volunteer to paid service in 1865, Harry advocated for raises for the firefighters. In 1866 he made his argument before the legislature, securing a 20% wage increase.1 In 1885, he donated $1,000 of his own money to the burial fund of the Association of Exempt Firemen. In 1890, as part of the Fireman’s Association of the State of New York, he helped establish The Firemen’s Home in Hudson, New York, a home for elderly and injured firefighters that still exists today.2
 1 “Harry Howard Is Dead,” The New York Times, February 7, 1896, p. 9, https://nyti.ms/2Z6tW3w.
2 “Harry Howard Is Dead,” The New York Times, February 7, 1896, p. 9, https://nyti.ms/2Z6tW3w.
3 “The Old New York Volunteer Fire Department,” Harper’s New Monthly Magazine, 1881, p. 380, https://books.google.com/books?id=d2YJAAAAQAAJ&pg=PP1#v=onepage&q&f=false.
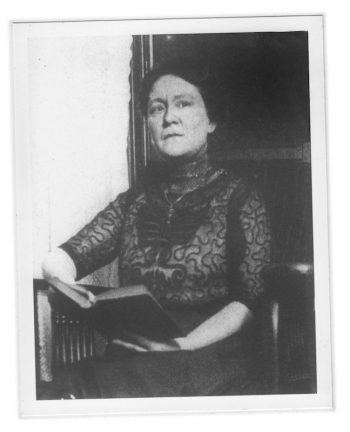 ISABELLA SEAHOLM GOODWIN (1865–1943)
Isabella Loughry felt she was “born to do” police work at a time when women were not hired as formal police officers. At age nineteen, she married a police officer and always took great interest in his business. In 1896, Isabella Seaholm lost her husband and was left to raise four children by herself. She took the civil service exam and was hired by the New York City Police Department as a “matron.” Little did she know her dreams were going to come true and pave the way for thousands of women officers across the United States.
For more than a decade, Seaholm did the only kind of work women did for the NYPD: cleaning jail cells and caring for inmates. After Theodore Roosevelt became Police Commissioner, he made it possible for matrons like her to do police work, especially on crimes considered more in women’s domain like those involving women or children. Her detective work picked up in 1910 and by 1912 she had “been responsible for the arrest and conviction of more crooks…than all the other women investigators and detectives doing similar work in the city put together,” according to a New York Times article.1
And then Seaholm’s big break came: In 1912, a group of men robbed a bank vehicle and took $25,000 in broad daylight in downtown New York City. One of the ring leaders was supposed to be a man named Eddie “The Boob” Kinsman, but the police didn’t have enough evidence to arrest him. So, they went to Isabella. She agreed to pose as a maid in the boardinghouse of Kinsman’s girlfriend, known as Swede Annie. She befriended Annie and gathered evidence on Kinsman in secret. She persuaded Annie to tell her that Eddie had admitted to the crime and Isabella tracked how Kinsman had spent the stolen money. Thanks to her dangerous, crafty work, the police nabbed Kinsman.
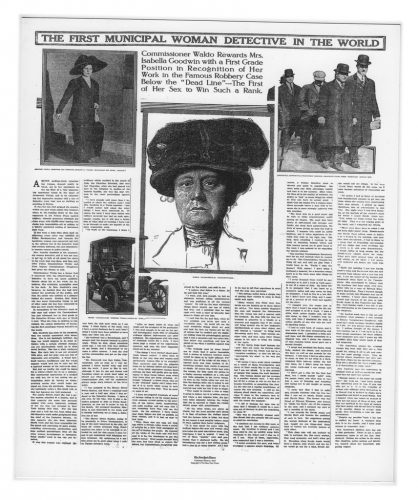
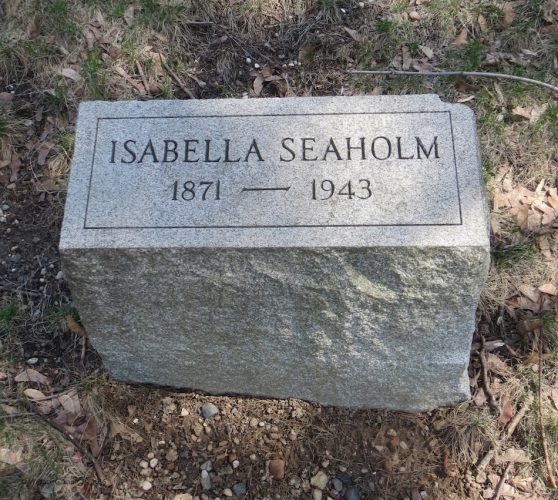 1 “The First Municipal Woman Detective in the World,” The New York Times, March 3, 1912, https://nyti.ms/3cbLHCv.
2 Corey Kilgannon, “Overlooked No More: Isabella Goodwin, New York City’s First Female Police Detective,” The New York Times, March 13, 2019, https://nyti.ms/2TyS0uu.
Activity Series: Bringing Legacies to Life: Green-Wood’s Most Fascinating Permanent Residents
Curriculum Connections:
New York State Social Studies Framework (Grade 4)
A. Gathering, Interpreting, and Using Evidence
1. Develop questions about New York State and its history, geography, economics, and government.
2. Recognize, use, and analyze different forms of evidence used to make meaning in social studies (including sources such as art and photographs, artifacts, oral histories, maps, and graphs).
New York State Social Studies Framework Practices (Grade 6-8)
Gathering, Interpreting, and Using Evidence
Identify, effectively select, and analyze different forms of evidence used to make meaning in social studies (including primary and secondary sources such as art and photographs, artifacts, oral histories, maps, and graphs).
Focus Figure 1: Henry Chadwick, “Father of Baseball”
Materials:
● Henry Chadwick source packet:
○ Photo of his monument
○ Source 1: Scientific American article about pitching
● Profile of Chadwick on Green-Wood’s website
● Paper and pencil
Step 1: Learn about Chadwick
● Start by looking only at Chadwick’s monument. Observe it closely.
○ What do you KNOW about him based on his monument?
○ What do you guess or infer?
○ What do you WONDER about him?
○ Why do you think he’s called the “Father of Baseball”?
● Read Chadwick’s biography on Green-Wood’s website and the article that he wrote for Scientific American. Note: the whole article may be hard to read. Read the first paragraph and then check out the images.
○ What do you KNOW about him based on these sources?
○ What do you guess or infer?
○ What do you still WONDER about him?
○ Why do you now think he’s called the “Father of Baseball”?
○ Did you make any inferences based on his monument that these other sources confirmed? Or did these sources change your mind?
Step 2: Become the founder of a sport!
● Invent a game that you and your family can play in your home.
● Follow Chadwick’s lead:
○ Invent at least two RULES for your sport. Tips: think of what it takes to win, and at least one thing that is not allowed.
○ Invent special lingo for your game. What words can you make up that apply to your game and what do they mean?
○ Tips for inventing a sport for your home:
Use items you already have on hand.
Think about how someone can win or lose the game first. What is the object of the game?
Consider games that involve moving an item from one place in your home into another, or into a “goal” space. Make sure the item is not special or fragile.
● If you are moving an item around, what parts of your body are or are not allowed to touch it. Hands? Feet? Or are you only allowed to move it with another item, like a stick?
How will people use their bodies in this game? Make sure you move safely in your home!
What is the best surface, or field, for your game? Does this game get played mostly on the floor? On a table? On a bed? How do you set up your field for the game?
Who are the players of your game? Do individuals play against each other, or on teams? How many players can there be?
How is your game scored? How many points does it take to win? Can a player or team ever lose a point? If so, how? What happens if there is a tie?
What makes your game challenging? How can you add in obstacles that make it harder for either side to win?
Step 3: Reflect and Share
● What was easy and what was hard about coming up with your own game and special words for it?
● Chadwick didn’t play baseball professionally, but he’s still considered a “father” of the game. What do you think his most important contribution was?
● What other figures besides players are important in a sport you love? How do they make the game interesting, important, or more widespread?
● Share your game with Green-Wood! Share a video or picture with us on Instagram using the hashtag #GreenWoodisMyClassroom.
Focus Figure 2: Susan Smith McKinney Steward, a pioneering doctor
Materials:
● Susan Smith McKinney Steward source packet:
○ Photo of her monument
○ Source 1: Source 1: Brooklyn Daily Eagle article February 7, 1870 about her medical school
○ Source 2: Brooklyn Daily Eagle article April 10, 1893 about an art show in her home
● Profile of Steward on Green-Wood’s website
● Paper, pencil, scissors, markers
Step 1: Learn about Steward
● Start by looking only at Steward’s monument. Observe it closely.
○ What do you KNOW about her based on her monument?
○ What do you guess or infer?
○ What do you WONDER about her?
● Read Steward’s biography on Green-Wood’s website and the article excerpts about her.
○ What do you KNOW about her based on these sources?
○ What do you guess or infer?
○ What do you still WONDER about her?
○ What was it like to be a woman in medical school?
○ Did you make any inferences based on her monument that these other sources confirmed? Or did these sources change your mind?
Step 2: Make a poster for a cause you care about!
● Pick a cause you care about:
○ What is something in your community or school that you want to change?
○ Is there something you think is unfair or unjust?
○ Is there a group in your community already fighting for change that you want to help?
● Make a poster to share your cause with others:
○ Think about what you can do to make change in your community or to help your cause
○ If there is already an organization working for that cause, how can you help them?
○ What do you want people to know about your cause? How can you get others to care about it too?
○ Tips for making your poster:
Find exciting facts
Use big letters
Use pictures as well as words. What images can illustrate your cause?
Colors! Make it bright and eye-catching!
Step 3: Reflect and Share
● What cause did you choose to make a poster for? Why?
● What causes did Susan McKinney Steward care about? How did she give back to her community?
● How did she get others to care about her causes?
● What were some challenges she faced and how did she get past them? Are there any challenges in fighting for the cause you care about?
● Share your poster with Green-Wood! Share a picture with us on Instagram using the hashtag #GreenWoodisMyClassroom.
Focus Figure 3: Charles Feltman, Coney Island Restaurateur
Materials:
● Charles Feltman source packet:
○ Photo of his monument
○ Source 1: Feltman’s obituary
○ Source 2: postcard of Feltman’s restaurant
● Profile of Feltman on Coney Island History Project’s website
● Profile of Feltman on Coney Island History Project’s website
● Paper and pencil
Step 1: Learn about Feltman
● Start by looking only at Feltman’s monument. Observe it closely.
○ What do you KNOW about him based on his monument?
○ What do you guess or infer?
○ What do you WONDER about him?
● Read Feltman’s biography on Coney Island History Project’s website, his obituary, and look at the postcard of his restaurant. Note: if the whole article is too long just read the first paragraph and the headline.
○ What do you KNOW about him based on these sources?
○ What do you guess or infer?
○ What do you still WONDER about her?
○ Did you make any inferences based on his monument that these other sources confirmed? Or did these sources change your mind?
Step 2: Cook a food that represents your culture/heritage with you family!
● What are foods that are important to your culture/heritage/family? It could be:
○ a recipe passed down in your family
○ a new food that has ingredients that connect to your culture or heritage
○ a food you cook for special occasions or holidays
○ a food specific to a place in this country or another country where your family is from
○ any food that you think represents you or your culture
● Find a recipe. Maybe someone in your family has a recipe already or you can look one up online
● Cook with your family!
Step 3: Reflect and Share
● Why did you pick the food that you did? How does it connect you to your culture/heritage or family?
● How does eating this food make you feel? Would you miss it if you moved somewhere that did not eat that food?
● Frankfurters were a popular dish in the region of Germany where Feltman grew up. Why do you think he wanted to bring this dish with him to the United States?
● The hot dog was an invention that combined food from Feltman’s German heritage with his American experiences. Can you think of any other foods that combine different cultures?
● Share your food with Green-Wood! Share a video or picture with us on Instagram using the hashtag #GreenWoodisMyClassroom.
Focus Figure 4: Anna Ottendorfer, German newspaper owner
Materials:
● Anna Ottendorfer source packet:
○ Photo of her monument
○ Source 1: New York Times article about her funeral
○ Source 2: Photo of the New Yorker Staats Zeitung
● Profile of Anna Ottendorfer on Green-Wood’s website
● Paper and pencil, scissors, tape/glue
Step 1: Learn about Ottendorfer
● Start by looking only at Ottendorfer’s monument. Observe it closely.
○ What do you KNOW about her based on her monument?
○ What do you guess or infer?
○ What do you WONDER about her?
● Read Ottendorfer’s biography above, the article about her funeral, and look at the photograph of the newspaper. Note: the whole article may be hard to read. Read the first beginning and the section about Mr. Schurz address that talks about her work.
○ What do you KNOW about her based on these sources?
○ What do you guess or infer?
○ What do you still WONDER about her?
○ Did you make any inferences based on her monument that these other sources confirmed? Or did these sources change your mind?
Start a newspaper covering the news in your household!
○ Note: it doesn’t have to be long, it can just be one page
● What do you want to call your newspaper?
● What are some stories you want to report on? What is going on in your household? Has anything exciting or unusual happened that you want to report on?
● Some tips for creating a newspaper:
○ Interview a family member
○ Write a story about a pet or stuffed animal
○ Review a book or movie you saw or meal you ate
○ Write about an activity you and your family have done
○ Research a topic that interests you and write about it
● Come up with catchy headlines for your stories
● Draw or find pictures to go with the stories
● Put it all together:
○ Write the title of your newspaper and today’s date on the top of a sheet of paper
○ Cut out your all your stories and pictures and glue or tape them together on one piece of paper, or if you have more stories, make multiple pages of your paper
● Write all the stories yourself or have other people in your household contribute to the newspaper too!
Step 3: Reflect and Share
● What was easy and what was hard about making a newspaper? Were there stories that were easier to write than others?
● Anna Ottendorfer ran a German language newspaper called the New Yorker Staats Zeitung. Why do you think having a newspaper in her language was important to her and other German Americans? Have you seen other newspapers in languages other than English?
● Do you think having newspapers in your language are important? What kinds of things do people get from reading newspapers?
● Did you learn anything new writing your own newspaper?
● Share your newspaper with Green-Wood! Share a video or picture with us on Instagram using the hashtag #GreenWoodisMyClassroom
Focus Figure 5: Frederick August Otto Schwarz, toy store owner
Materials:
○ Photo of his monument
○ Source 1: Advertisement in The New York Times
● Source 2: 1911 toy catalog
● Profile of FAO Schwarz on Green-Wood’s website
● Paper and pencil, scissors, markers, tape/glue
Step 1: Learn about Schwarz
● Start by looking only at Schwarz’s monument. Observe it closely.
○ What do you KNOW about him based on his monument?
○ What do you guess or infer?
○ What do you WONDER about him?
● Read Schwarz’s biography above and look at the store catalog and newspaper ad. NOTE: Make sure to look through the first few pages of the catalog for photos of the store
○ What do you KNOW about him based on these sources?
○ What do you guess or infer?
○ What do you still WONDER about him?
○ Why do you now think he’s called the “Father of Baseball”?
○ Did you make any inferences based on his monument that these other sources confirmed? Or did these sources change your mind?
Step 2: Create your own toy!
● Make a toy out of materials you find in your home. Make sure to ask your parents before using any materials you find.
● Get inspired: look at the toys in FAO Schwarz’s catalog and think about toys you like to play with
● Think about material: what materials do you have lying around the house. Anything could become part of your new toy: toilet paper tubes, toothpicks, egg cartons, fabric, plastic bottle tops. Check your recycling bin!
● Get your materials together and start creating
○ If you don’t know where to start, look at your materials for inspiration. Does the shape remind you of something? Can you see a way that it could be turned into something else?
○ Use scissors, tape, glue, and markers to put your materials to use
○ If you still don’t know what to make, that’s okay! Start constructing and see what happens.
Step 3: Reflect and Share
● What was easy and what was hard about making your own toy?
● FAO Schwarz’s toy store was the biggest in the world in the nineteenth century. Looking at the toys in the catalog, how are they similar or different from the toys you play with?
● Share your toy with Green-Wood! Share a video or picture with us on Instagram using the hashtag #GreenWoodisMyClassroom
Nature
Cemetery Geology!
Materials
● This video about the most common kinds of stone found at Green-Wood
● Optional: This note-taking worksheet
● These images of Green-Wood monuments
● Pencil and paper, if you want to take notes.
Introduction
● Green-Wood and other cemeteries are great places to explore different types of stone. We have over 100,000 grave markers and memorials that we collectively call “monuments” and mausoleums on site. While made of many different materials, three are most common: granite, marble, and brownstone.
● In a moment, students will watch a short video featuring Neela Wickremesinghe, Green-Wood’s Robert A. and Elizabeth Rohn Jeffe Director of Restoration and Preservation. She’ll explain information about granite, marble, and brownstone and how to identify buildings made of these materials using three Green-Wood mausoleums as examples.
● After students watch this video, they can then review the monuments on this page and try to guess what each is made from. Answers are at the bottom of the page, so no peeking!
Exploration
● Watch the video! We recommend viewing twice.
● First viewing: just watch and listen. Second viewing: take notes on the qualities of each stone. You can use this sheet!
Activity
● Check out the monuments on this page. See if you can identify which monument is made of which stone.
● Answers are at the bottom of the page.
After your visit:
● Look out your window or walk around your neighborhood. Can you spot any buildings or other structure made out of brownstone, marble, or granite?● If you need help identifying a building material, send us a picture on Instagram with the hashtag #GreenWoodIsMyClassroom.